Techniques in Cutting Paper
Five basic principles for all cutting and handling operations: (1) Safety first. (2) Maintain tools and equipment
the best possible repair. (3) Practice and insist upon cleanliness. (4) Understand and follow directions. (5)
Establish and maintain an orderly procedure for all repetitive operations.
BEFORE CUTTING the operator must read, understand and follow the directions for the order in process. This involves
the ability to interpret package labels' and to calculate the total number of large sheets to cut.
Interpretation of the label. Labels list the number of sheets in the package, the trade name of the paper, size in
inches, weight per ream, color, finish and the direction of grain, for example: Beckett cover. 20 X 26-65 lb.,
white antique finish, long grain. Some labels indicate direction of grain by underscoring one dimension: 20 X 26-65
lb.
The importance of grain direction varies with the job. Jobs which are to be folded should be cut so the folds are
made in the same direction as the grain. Jobs which must have strength to stand on edge, such as machine
bookkeeping ledgers, should have the grain running vertically as the sheets stand. Case bound. side and saddle
stitched books should have the grain running parallel with the spine of the book.
For purposes of identifying the weight of odd sized sheets, papers in this country have been assigned a basic size.
The basic weight is one ream of paper in its basic size. Basic sizes for common papers are:
17 x22 —Bond, ledger, writings, gummed, mimeograph, onionskin, manifold
19 x 24 —Blotting
20 x 26 —Cover
22 x 28 —Blanks, railroad board
22 1/2 x28 1/2—Pasted bristol, post card 253,4 x3o1)4—Index bristol
24 x 36 —Newsprint, poster, parchment
25 x 38 --Book
25 x 40 —Box board
26 x38 —Chip board
26 x 39 —Carbon
It is customary, for example, to refer to a paper as a "65 lb. cover" meaning that it weighs 65 lbs. per ream of
5oo sheets in its basic size, 20 X 26. Therefore, a label reading Beckett cover, 23 x 35—100 1/2 (Subs. 65) means
that the ream which weighs 65 lbs. in its basic size weighs 100 1/2 lbs. in the 23 x 35 inch size.
To determine the basic veight of any size sheet, set up the formula:
area of odd size sheet ream weight of odd size sheet
----------------------- = -------------------------------
area of basic size sheet ream weight of basic size sheet
Using this formula and the above example: the area of the odd size sheet is 23 x 35
or 805 square inches: the area of the basic size sheet is 20 X 26 or 520 square inches. Thus,
100 1/2 805
----------- = -----------
X 520
By cross multiplication: 805 x = 52,260, and x = 65 lbs., the unknown basic
weight.
There is a trend toward labeling packages in t,000 sheet quantities instead of the ream. Where this is done the
marking 130 M and 65 lb. mean the same thing.
Two ways to figure paper cuts. The number of sheets of a given small size which may be cut
from a large sheet may be determined by simple division and multiplication.
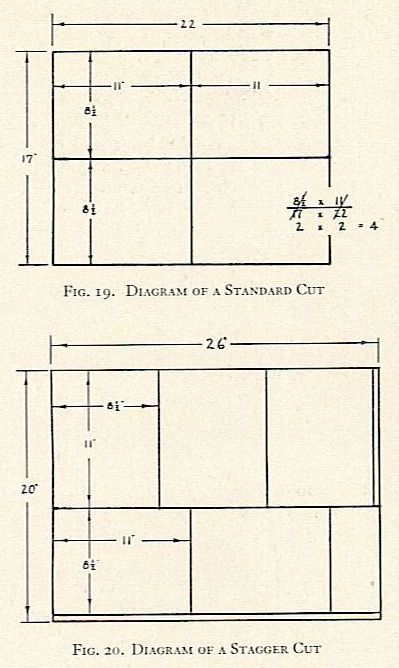
For example: How many sheets 8.5 x 11 inches can be
cut from a sheet 17 x 22 inches? 17 ÷ 8.5, = 2 and
22 ÷ 11= 2; 2 X 2 = 4 sheets total. (See-figure 19.)
Caution: In figuring paper problems where grain direction is important, be certain that the division is according
to the correct grain direction in the large sheet even though less waste would result from a different cut. For
example: How many sheets 5 x 7 inches (grain 7 inch way) can be cut from a sheet 25 x 38 inches (grain 25 inch
way)? In this case the 7 inch cut must be divided into the 25 inch dimension regardless of the fact that 4 less
small sheets may be cut from the large sheet.
A second method of figuring stock is the diagram and stagger cut. This may be used only where grain direction is
immaterial. For example: Only 4 sheets 8.5 x 11 may be cut from a sheet 20 X 26 inches using the first method. By
staggering the cut as shown in figure 20, 5 sheets may be cut from a large sheet, resulting in a 20 per cent
saving.
Once the number of sheets which can be cut from each large sheet is found, that number divided into the total
required for the job gives the number of large sheets to be cut.
Calculation of spoilage. Additional sheets necessary for spoilage in presswork and bindery
operations are figured as a percentage of the total number of sheets needed for the job. It is necessary for the
cutter operator to interpret the order to determine the number of times the job must pass through the press and
whether or not there will be bindery work. The following table is suggested as a starting point for computing
spoilage allowances:
Work and Back
Work and Turn
Work and Tumble
One Side Only Work and Whirl
Number Each Each
of One Addl One Aden Bind.
Sheets Color Color Color Color Oper.
250 20% 15% 35% 25% to%
500 8 20 1.2 6
1,000 8 6 12 8 4
2,000 6 4 9 3
5,000 4 3 5 2
10,000 3 2 5 3 1.5
25,000 2 3 2
50,000 1.5 .8 2 -5
100,000 .6 I .5 .8 -3
Caution: In using a spoilage table, a periodical check of actual spoilage should be made to determine whether the
allowances are too high or too low.
Cutting. After the operator has located and figured the necessary paper, the packages should
be taken to the cutting machine and opened. Partial reams should be counted, with the remainder returned to the
shelves in the wrapper for maximum protection. The paper should be jogged, if necessary, and loaded into the cutter
in convenient lifts.
To eliminate friction between the paper and the cutter bed, clean the bed daily, coat with paste wax, and polish.
Care should be taken not to turn the sheets over or endfor-end during the jogging and loading, particularly in the
case of watermarked papers or papers with different surfaces on each side. Do not jog against the back gauge.
Always adjust the back gauge by moving it toward the operator from a measure larger than the one desired. When
several cuts are to be made to the same setting, lock the back gauge with the locking handle under the front of the
cutter bed.
Time may he saved by doubling up the cut sheets. For example: In cutting 5 1/2 x 8 1/2 inch sheets from 22 X 34, do
not cut the sheets into 5 1/,2 or 8 1/2 inch strips. Instead, cut the large sheets to 17 x 22, then to 11 X 17, 8
1/2 x ``,
and finally to 5 1/2, x 8 1/2.
Where best quality is demanded the stock should be cut to a size slightly larger than the finished size, and then
should be trimmed on all four sides to the final dimension. This final trim is often made after the job is
printed.
In practice it will be noticed that the cut edge of the paper which is next to the bevel of the knife is fuzzy in
appearance. This edge is rough and does not present an ideal surface to contact the press guides. It should be
trimmed off where possible.
Machine made paper emerges from the paper making machine in a continuous strip or web, which is wound into a roll.
The surface of the paper is finished while in roll form, after which the web may be cut into sheets on a rotary
shears known as a sheerer. The sheeter produces a "mill edge" which is not always straight or true at the corners.
For accurate presswork paper should be trimmed and squared on the sides to be used as guides.
Press forms demanding extreme accuracy, such as work and tumble (work and flop), must be trimmed on all edges which
contact the press guides.
Improvement of the routine of paper cutting. Niel Gray, in his book Paper Cutting Machines,
summarizes the problem of paper cutting as follows:
A primary difficulty in cutting machine work is due to the great variety of papers and sizes required to be handled
by the machine. This varies from little narrow slips and piles to piles the full width of the table, from a few
sheets to a pile the full height allowed by the clamp, and from soft book papers to stock nearly as tough as tin.
All these varying conditions cannot be met with equal success on one automatic machine. Therefore, superior
intelligence rather than muscle should be required of the operator.
Good judgment is required To determine the proper height of a pile TO cut. This will often depend upon how much can
be grasped each time with th--hands and put into place in good order. Time may be lost and sheets wasted trying to
fill up the capacity of the machine; smaller piles and more of them may sometimes be a more economical method. The
time taken for the knife stroke is only a second, while the time necessary to jog up several lifts may be minutes
more than to put one lift into place. The convenient lift, as large as possible, and uniform in size if there are
several of them, is the advisable practice.
Removal of cut stock and waste disposal. Of vital importance to the cutter operator's speed is an
o:derly procedure in removing cut paper from the machine and stacking it for transfer to other departments.
Convenient tables with ample surface, or bindery trucks, will aid in eliminating unnecessary motions and steps.
Each stock pile should be neatly stacked to prevent its capsizing, and should be clearly labeled with the name and
the number of the job for which it has been cut.
Each cutter should be equipped with a large container for waste and trimmings. Throwing waste on the floor is
unsightly, is dangerous to the operator's footing, and constitutes a fire hazard. It should be neither practiced
nor
allowed.
Many plants in metropolitan areas bale their waste and sell it. This waste is particularly valuable if it is
quantities which can be sorted as it is cut. In addition, larger plants often install low pressure vacuum tubes
into which the waste may be thrown. The cuttings travel through the tubes from all machines to a central point for
baling.
To improve the accuracy of cutting. Cutting sheets accurately to a minimum tolerance requires
first, a sharp knife, second, correct clamp pressure, and third, a lift of such thickness as to be cut easily
without strain by the machine in use. Each of these factors affects the amount of "draw- which the paper
undergoes.
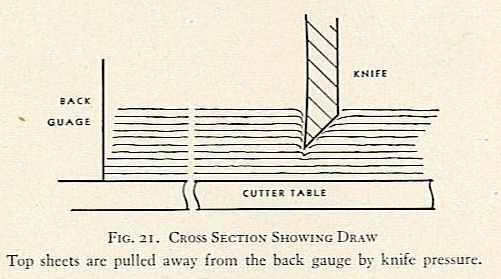
Draw is the condition wherein the uppermost sheets in the pile being cut are pulled away from the back guide toward
the operator due to the pressure of the knife forcing its way through the pile. The result is that these top sheets
will be cut smaller than sheets lower in the pile.
All knives draw the paper to some extent. It is not possible to eliminate this draw with clamp pressure. However,
weak clamp pressure will cause the paper to draw more than usual. The right pressure for the clamp on a particular
machine should be determined. and then should remain unchanged for all papers except in rare instances. Periodic
testing will reveal whether the clamp needs tightening. Manufacturers will furnish information as to how these
tests can be made on the various makes of paper cutters.
Draw sometimes may be reduced by placing several sheets of cardboard on top of a tough stock. When a lift is so
small that the clamp does not apply enough pressure. the pile may be heightened by adding strips of cardboard under
the clamp. In cutting small lifts, lower the clamp gently to the paper with the foot treadle before cutting. In
this way the shock of the clamp descending will not move the paper out of register with the side and back
gauge.
When cutting several lifts of one kind of paper, each lift should be of equal height so the clamp pressure and
amount of draw will be uniform. When cutting sheets in very close register lifts should not be more than 3.!!
inches high, and even less on tough or spongy papers. Generally, the amount of the lift must be decreased as the
size of the sheet increases.
Paper cutting machines have a space varying from 3 to 7 inches between the holding surfaces of the clamp and the
cutter bed. While the height of the lift of different papers may be determined best by actual practice, the
following table may be used as a starting point for accurate cutting with a reasonable minimum of spoilage:
PAPER HEIGHT OF LIFT PAPER HEIGIIT OF LIFT
IN INCHES IN INCIIES
LARGE SMALL LARGE SMALL
SHEET SHEET SHEET SHEET
Newsprint 5 5 Super book 372 4
Bond 44 Enamel book 21/2 3;4
Ledger 4 Onionskin 3 3
Machine finish Cover 2 3
book 4 Chipboard 2 3
Antique book a% 3 Carbon 2 3
15o sheets 250 sheets 5o sheets 75 sheets
Cutting printed sheets. The foremost rule in cutting printed sheets is to use as jogging and
cutting guide edges the same guide edges used in the printing, folding and other operations. Guide edges should be
marked plainly. If not, the cutter operator should ask for directions. Too much importance cannot be attached to
this rule.
When stacking printed sheets the operator should check constantly to see that all sheets in the pile are in the
same position. A top sheet removed for inspection should be replaced carefully in the proper order. Before cutting,
the operator should check each pile. One wrong cut can spoil an entire pile.
To cut strips of equal widths. Most modern machines are equipped with inch rules imbedded in
the front surface of the cutter table. These rules have a zero reading at the knife and measure inches away from
the knife toward the operator. To cut strips, place the paper in the cutter and trim a small margin from the near
edge. Remove the trimmings and move the back gauge forward until the trimmed edge touches die measure desired. Cut
and remove the strip. Repeat the process until the last strip is cut. This system is time saving in that only one
jogging of the pile is required.
On machines not equipped with table rules, measure the desired width of the strip from the point where the knife
contacts the cutter stick. Attach a piece of cellulose tape to the cutter table indicating the width wanted and
proceed as above.
To carry lifts of large sheets. Judge an amount that may be carried without strain. Overloading
may result in bodily injury or damage to the paper. Roll the left hand one-third of the stock across the center
one-third as shown in figure 22. Roll the right hand one-third over the left. Cradle the rolled stock in both arms
for carrying to avoid damage to edges of the paper.
In stacking the paper into a new pile, care should be taken that the paper is not turned end-for-end or upside
down. To assist in stacking the paper into an orderly pile, place a yardstick upon the top of the pile to hold the
top sheets in place while a new lift is being positioned. After the lift is in place remove the yardstick and place
it again upon the top of the pile in readiness for the next lift.
To load large, flexible sheets into a paper cutter. Difficulties of jogging and loading large sheets of book or
bond paper into a cutter may be solved by use of a jogging table with sidepieces. The sides should rise about five
inches above the surface of the table, should be perpendicular to the table surface, and should form a right angle
in the corner. The sides should be attached with screws to withstand the pressure of paper hitting against them.
The surface of the table should be smooth and highly polished to avoid friction between it and the bottom sheet of
the pile being jogged. Logically, this table should be placed immediately behind the operator at the cutter so that
he may jog the sheets, lift them, and place them in the cutter simply by turning around.
First determine the maximum number of sheets which can be lifted flat with ease. Attempts to handle and overload
will cause the operations to be slowed considerably. Roll the lift, place it on the jogging table, and air the
sheets by bending them into a U shape and pulling the top
..sheets taut. Jog the sheets into an even stack by bouncing the aired stack against the sidepieces of the table.
Do not try to jog extremely large sheets by standing them on edge.
Jogging large sheets in quantities merits the installation of a machine to speed the work. Figure 14 shows a floor
model, double action jogger suitable for large sheets. After the sheets are aired, they are placed on the inclined
table which vibrates at high frequency, causing the sheets to contact the stops at the two lower sides of the
table.
When the sheets are jogged satisfactorily, roll the lift for carrying so that the roll may be placed into the
cutter lengthwise. Place the lift in the cutter in such a position that the pile edges, when unrolled, will fall
about one inch from the side guide and back gauge. Unroll the lift and move the pile gently to contact the side and
back. After the sheets are in place, hold the edge of the pile next to the side guide firmly with one hand, and
with the other squeegee the air out from between the sheets by dragging a yardstick across the top of the pile from
the guide edge to the open edge.
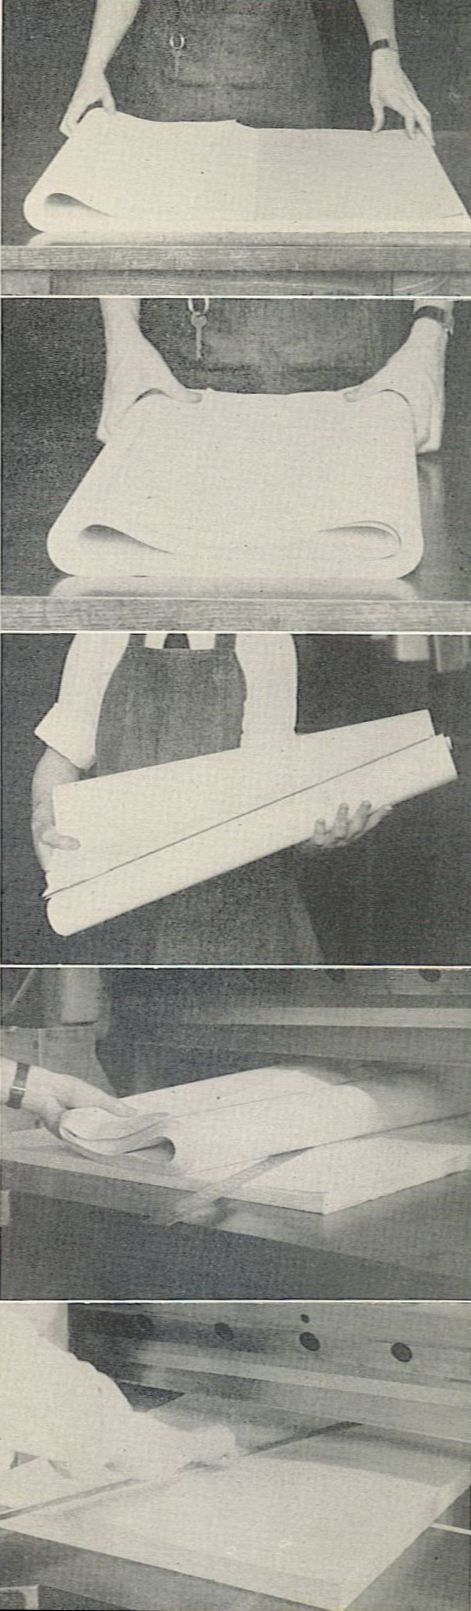
FIG. 22. STEPS IN LOADING LARGE SHEETS
Top to bottom: (a) Roll one third of a jogged lift over the center. (b) Roll the other third of the lift over the
center. (c) Cradle the lift for carrying. (d) Place the lift in the cutter and unroll. (c) When properly positioned
for cutting, remove excess air from the lift with a yardstick.
.
Number of Sheets to the Average Lift
BOND*
Bonds. Hats, ledgers, gummed, label,
and similar papers 500
BOOK
News, poster, antique, eggshell, machine finish,
S. & S. C.—up to 8o lb. sub. 500
Coated up to too lb. sub. 250
Coated 120 IO 150 lb. sub 167
Coated t6o lb. sub. and over 125
COVER
Light or medium weight 250
Heavy weight too
INDEX
I TO lb. sub. 200
140 lb. sub. 150
Over 140 lb. sub. . TOO
Pasted or coated, 2-ply 200
Up to 4-ply 15o
BLANKS
4 and 5-ply 100
6 to 8-ply 75
to-ply or over 5°
MANILA TAG
Up to too lb. sub. 200
Up IO 150 lb. sub. 150
Figures in the table represent hours or decimal fractions Over 150 lb. sub. too of hours. Preparatory time, .t
hour. Cutting time per lift:
SHEET SIZES AND KINDS OF PAPER I00 CO 120 lb. sub. I00
GROUP A GROUP B GROUP C 140 lb. sub. 75
22 X 28 28 X 44 OVER *Add 5o per cent to cutting time for glazed label and
2572 x 30Y? OR SMALLER 28 X 44 tissue and to per cent for all thin papers.
OR SMALLER BOND
NUMBER BOND* BOOK Example: What is the estimated cutting time for to,000
OF PIECES BLOTTING COVER BOOK letterheads, 8Y-, x ii inches, from 17 x 22 bond, 20 lb.?
TO EACH INDEX INDEX 8Y2 x it cuts four pieces from 17 x 22, therefore the job
SHEET BRISTOL BRISTOL requires 2,500 sheets. The size and kind of paper place it under group A. Cutting time per
lift in group A where four pieces are to be cut from the sheet is .1 hour. Under sheets to the average lift, bond
paper lists 5oo; therefore. the job requires five lifts. Five lifts at .t hour each equals .5 hour, plus the .t
hour preparatory time; total .6 hour.
See also: Mc Kiernan. Kenneth G. Par For Printers. Standards for Production. Chicago: Production Standards
Corporation. 1937. Pp. 181-228.
Trimming of pamphlets—small quantities. Before trimming. trial cuts should be made to determine the num- her of
pamphlets which may he cut accurately at one time. When this number has been decided, divide the total into
1Nfaterial in this section reproduced with permission from The Standard Book On Estimating for Printers by Fred W.
Hoch. New York: Fred W. Hoch Associates, Inc., 1946. Pp. 127-132.
When the first lift is in place. lay the yardstick on top of it and each succeeding lift to hold the sheets in
place while new lifts are being positioned. Caution: Be certain to remove the yardstick before cutting. In jogging
printed sheets, jog to the edges used as guides in the pressroom and bindery.
To determine cutting time. The United Typothetae of America fiat sheet cutting schedule may
he used to estimate the amount of time necessary to cut a given amount of paper, of a particular weight or
thickness, sheet size and finish into a given number of small pieces per sheet. Accurate estimating of cutting time
using this table depends upon proper grouping of the paper to be cut into the columns of the table.
Three steps are necessary in using the table to determine the amount of cutting time: (I) Find the number of lifts
by dividing the quantity to be cut by the average number of sheets to a lift. (2) Classify the job under the proper
column of sheet size and kind of paper; move down the column until aligned with the number of pieces per sheet;
then note cutting time per lift. (3) Multiply the cutting time per lift by the number of lifts and acid the
preparatory time of a hour.
BLOTTING
2 .0 5 .0 7 .10
3-4 -1 .12 .17
5-8 .15 .2 .27
9-16 .22 -3 -4
17-24 -3 4 -5
25-32 -35 -47 .6
33-40 .4 -55 -7
41-48 .45 .62 .8
49-56 -5 .7 -9
57-64 -55 .77 t.o
65-72 .6 .85
.65 -9
81-96 -75 -95
97-112 .8 1.0
113-128 -9 1.05
129-144 -95 LI
17
groups equal to that number. The first cut should be made on the side opposite the stitching, the second should be
the tail or bottom, and the third the top or head.
The problem of trimming pamphlets arises from the fact that the folded and stitched side is more bulky than the
sides which are to be trimmed. As the clamp pressure is applied the pamphlets will slip and slide away from the
guide edges of the cutter. One method of preventing the sliding is to attach a finger to the back gauge to hold
down the bulky side of the pile. A second method is to trim the front edge, then turn half the trimmed edges to the
left and half to the right before making the head and tail trims. This method may be used safely only on pamphlets
up to 32 pages in thickness.
In the case of thick pamphlets. the reversing of fronts and backs is not advisable. The head and tail trims should
be made with the folded and stitched side to the right. If the folded edge is to the left the knife tends to tear
the corners, particularly if the knife is dull.
Several pamphlets stacked in a pile present a top surface not parallel with the cutter clamp. Therefore, in order
to hold the pamphlets securely it may he that in addition to using a hold down finger on the back gauge it vill be
necessary to build up the clamp face to apply more pressure to the trimmed side than to the stitched side.
To build up a clamp face: With a shears cut a strip the width of the clamp face from a piece of binder's board.
From that strip cut lengths starting at I inch longer than the pamphlet width and then decreasing in length by
inches per piece. That is, for a pamphlet 6 inches wide cut a strip seven inches, another 5;4, another 4, and
another 2Y, inches. Cement these strips together flush at the sides and one end with padding compound. Do not use a
glue which becomes brittle as it hardens.
Before attaching the built-up piece to the clamp face, the front edge trim should be made using the back gauge hold
down finger. When this first trim is completed, the built- up piece should be cemented to the clamp face parallel
to the clamp front edge. Since the folded edges are turned to the right for trimming, the thick part of the
built-up piece should be to the left flush with the left end of the clamp. The tail trim must be made with the back
covers up and the head trim with the front covers up.
Trimming of pamphlets—large quantities. When trimming large mumbers of pamphlets. three piles
may be cut at one time by splitting the adjustable back gauge. The back gauge is made in three parts aligned with
dowel pins and held with locking bolts. To split the gauge: Adjust • and lock it to the measure desired to trim the
front edge of the pamphlets. Remove the dowel pins and loosen the locking bolts as shown in figure 23a. Slide the
left hand section back to the measure necessary to trim the tail margin, test until satisfactory and tighten the
locking bolts. Next, slide the right hand section back to the measure needed to trim the head margin, test until
satisfactory and tighten the locking bolts.
After the measures are set and locked securely, determine the number of pamphlets which may be accurately trimmed
at one time and attach the hold down fingers to the back gauge as pictured in figure 23b. Attach built-up pieces to
both the left and right hand ends of the clamp face as described in the preceding section.
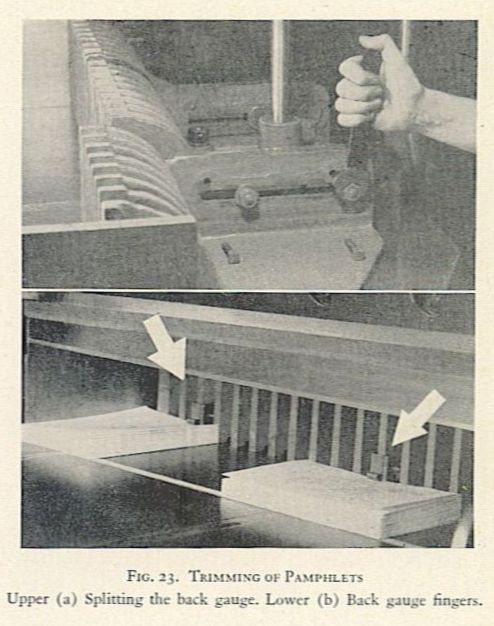
FIG. 23. TRIMMING OF PAMPHLETS
Upper (a) Splitting the back gauge. Lower (b) Back gauge fingers.
An orderly method should be established for passing the stacks from the untrimmed
group to the left section for tail trim to the center section for front edge trim to the right section for head
trim to the finished group. In other words, each section of the back gauge will be holding one stack of pamphlets
as the knife descends. After the cut is made the stacks should be shifted to the right for the next cut, with the
addition of a stack from the untrimmed pile and the removal of a finished stack to the trimmed pile. If unnecessary
motions are eliminated a substantial increase in production will result with no loss in quality.
Extremely long runs of trimming should be done on a specialty machine adapted to the job.
Safety first! Obviously, a paper cutter is potentially one of the most dangerous machines in a
priming plant. The exercise of caution must become a habit with any operator of a paper cutter. Several points of
danger may be listed:
(1) The machine should be kept clean and in good repair so the paper will slide freely and cut cleanly.
(2) The floor around the machine should be kept clean. Paper scraps, oil or any matter which prevents the
maintenance of a secure footing endangers the operator.
18
(3) The operator must always be on guard for repeat strokes of the knife. The knife should be allowed to come to a
complete stop before the hands are placed beneath it.
(4) Paper is heavy. Excessive loads may cause rupture. The operator should determine a convenient lift and not
exceed that.
(5) Paper is sharp. Flesh cuts caused by paper edges may be deep and vill invite infection. The best preventative
is to ke:fp soft, pliable hands through frequent applicaticns of glycerine. When cuts occur, they should be washed
with clean, cold water and antiseptic should be applied immediately.
(6) Each cutter should be equipped with two hand controls to prevent the operator from having either hand near the
blade during its descent.
(7) Horseplay and scuffling should not be allowed nor indulged in around any cutting machine.
(8) Particular care should be exercised in handling an unprotected knife during removal or installation.
(9) When the machine is being oiled, cleaned, repaired or adjusted, the power should be turned off.
|